


Fully Serviced
All items are meticulously serviced and restored to meet factory specifications
$0.00 USD
$0.00 USD
Bang & Olufsen
1985 – 1988
Retail price 485 euro in 1985
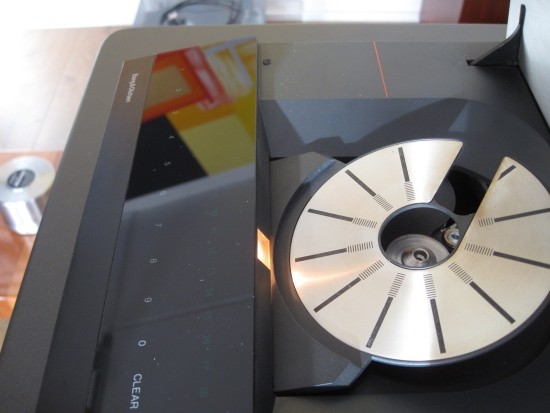
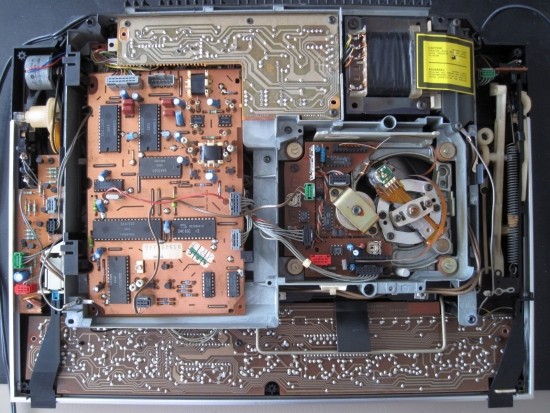
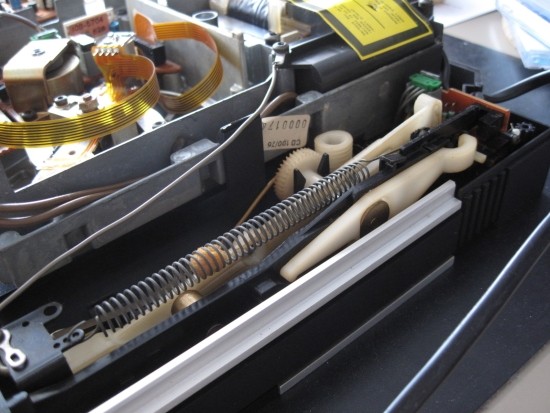
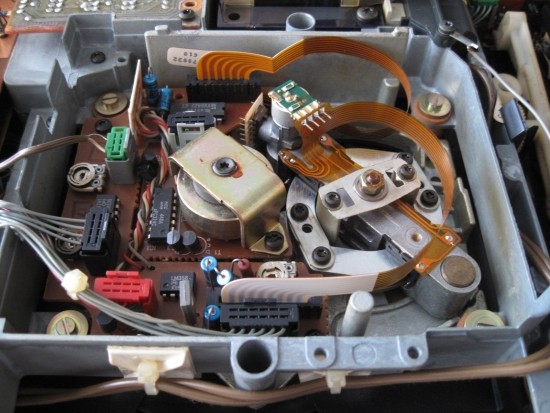
The CD-X looks incredibly futuristic with its touch screen buttons even today – imagine how it was received back in 1982! But would you believe that it was based on a Philips CD-104? Well of course you would, as almost every player of that time was based on a Philips player. Its seemingly flat profile would have one believe that a CDM-1 transport would never fit inside but if you look closely, the CD-X is less flat than it seems. Inside is a complete CD104, minus the loading mechanism and plus a two-fold flap operating mechanism, which is spread over the left most and right most side of the player. It’s still amazing that these units still work after all this time. DAC used is the TDA1540 14 bit unit with oversampling.
Sound
Soundwise the CD-x is very much like listening to a Philips CD104: smooth, colourful and very relaxed.
Below is a reprint from Beophile.com, an original ‘Gramophone’ magazine article:
Beogram CDX was a beautiful-looking free-standing compact disc player designed from the onset to be used within any system with the correct inputs. In the case of Bang & Olufsen products it was those which had a separate tape socket, or even a phono connection designed for use with a Beogram together with a built-in RIAA preamp.
The CD format in the early to mid-1980s was still a fledgling format. No one was particularly sure whether it was going to take off or not as the price of compact discs was still relatively high and the number of available discs very low. On top of that hi-fi manufacturers had just been through the VHS/Betamax/V200 debacle with many companies losing both face and money. Laservision was fighting a (losing) battle with other manufacturers of video discs and the whole market was very much up in the air. No one was really sure what was going to happen and manufacturers became a little coy when it came to investment in new technologies. Hence the use of other companies’ products came about. It was often a safer and cheaper option to use a tried and tested product rather than spend umpteen millions on the research and development of a product or a format which was possibly not going to sell.
Hence the use of Philips CD players came about. In the case of the Beogram CDX it was Philips CD104 which was used as a basis. Built in Belgium by the Philips giant the CD104 was one of a whole range of Philips’ products which lent themselves to other companies badges including that of the Marantz CD-34, the Mission DAD7000 and the Schneider CD1104. Not forgetting Bang & Olufsen’s CDX, of course.
The CDX was a lovely machine, reinventing itself as the Beogram CDX2 a couple of years or so later, and many fans of CD music owe thanks to this little machine. It’s interesting to note that for customers with no spare sockets avaiable to connect their CDX, an add on, the CD/Tape adaptor, could be bought separately allowing one to connect up their CDX to the tape recorder lead, using it that way. It fit under the side of the CDX where there is a small push-button to enable its selection.
YOU have to admire the way that Bang & Olufsen have steadfastly pursued their own ideas on styling, and produced over the years a range of smart-looking audio units which could never be mistaken for the products of any other manufacturer. This has given a welcome relief from the ubiquitous look-alikes in four-square black or silver coloured boxes, though it may have lost B&O a few sales in ’separates’ since their units present such a marked visual mismatch with the rest. However, their penetration into the local design-conscious Scandinavian market is doubtless healthy, as it is into countries like West Germany and to some extent the UK.
B&O designers also make up their own minds about what features and ergonomics the customer wants (helped by a panel of ordinary folk on whom all new designs are tried out) and this too leads to designs which have moved away from the norm.
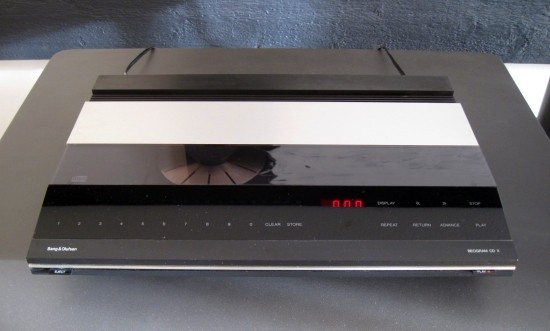
The new Beogram CDX (as a GRAMOPHONE man, I was pleased to see B&O retaining the “gram” suffix for their CD player as well as their turntables) certainly looks and behaves a little different from the general run of CD decks. Except for two push-switches on the narrow front edge, all controls are of the touch-sensitive type and are embedded along with the illuminated displays behind a transparent top panel. The two push-switches are for mains on/off (labelled Play) and Eject.
Pressing the latter causes the machine-long lid to open, the inner compartment to be illuminated, and the disc-platform to be tipped forwards at an angle. In theory this slanting platform should simplify putting a disc into the machine, but I slightly prefer the usual horizontal holders (and of course the CD player industry has almost completely gone over to gliding drawer front-loading configurations to facilitate stacking with other hi-fl units) so here again B&O might be said to be out of line.
To play a disc from the beginning, you just lay a finger on the word “Play”, the lid closes automatically, the player registers the disc’s “Table of Contents” data, and then starts to play the music. The green LED display at the left hand side indicates the total number of tracks, with the current track number in play flashing. A red display on the right shows the track elapsed time, or can be switched to indicate the total elapsed time, or the track and index number.
Other controls are more or less standard, such as track skip (by touching Advance or Return) and track search (by touching the appropriate arrows) when the laser moves at one of three speeds; in steps of 1 second to begin with, then steps of 10 seconds and finally, if you keep your finger on the arrow, steps of 1 minute. To play any particular track, you touch the required number (or pair of numbers for higher track numbers up to 99). Programming a sequence of tracks is done by touching each desired track number followed by ‘Store’, or conversely touching each number you want to omit, followed by ‘Clear’. In either case, the selected track numbers only will light up. Up to 40 items can be programmed in this way, including the same numbers repeated, so that a much longer total playing time can be set up than any single disc actually contains. There is also a Repeat function, for up to four times repetition of the whole disc, or a programmed sequence. Pause is obtained by touching ‘Stop’ briefly, and keeping your finger down for 2 seconds returns the disc to the start. Play is resumed by touching the word ‘Play’.
Taken from ‘Gramophone’ magazine – Dec 1985 (page 139)
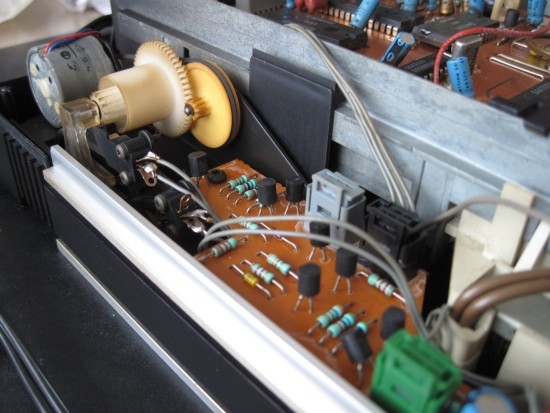
Inside Pics:
Couldn't load pickup availability
There’s something undeniably magnetic about vintage audio gear. The tactile weight of milled aluminum knobs, the warm glow of dial lamps, and—above all—the rich, analog sound that today’s sterile streaming boxes can’t quite replicate. But time is merciless: capacitors dry out, switches oxidize, and those gorgeous walnut cabinets lose their sheen. That’s where the art (and science) of our vintage audio refurbishment comes in.
Why Vintage Audio Still Matters
In the golden era of hi-fi—roughly the mid-1960s through the early 1980s—companies like Marantz, McIntosh, Pioneer, Sansui, and Technics were engaged in an arms race of build quality. This was before cost-cutting plastics and disposable designs; amplifiers were over-engineered, receivers were works of art, and turntables were precision instruments.
Owning one wasn’t just about sound; it was about status and permanence. These machines were built to last a lifetime—or two. The irony? Decades later, they often do, provided they’re given the care they deserve.
The Philosophy of Refurbishment
Refurbishment is not just about fixing; it’s about preserving authenticity while ensuring reliability. The goal is to keep that lush, analog character alive without compromising safety or sound quality.
Some enthusiasts chase museum-level originality—keeping every factory component in place. Others opt for sympathetic modernization, upgrading parts that never existed in the ’70s to improve performance. Both approaches can be valid; it depends on your vision.
The Turntable Store refurbishing process.. step by step
Step 1: The Initial Encounter
When we first meet a 40-year-old amplifier, we resist the urge to plug it in right away. That dusty Marantz 2270 might look gorgeous, but old electrolytics and brittle insulation can short instantly under full voltage.
Instead:
Tip: A faint musty smell? That’s often the scent of old phenolic boards, not trouble. But a burnt smell? That’s trouble.
Step 2: Deep Cleaning & Control Detox
Dust is the enemy of good sound, that is why we clean the interior carefully with compressed air and a soft brush.
The real magic comes with switches and potentiometers. Over decades, oxidation builds up, causing scratchy controls and dropouts. A deep contact clean in each pot and switch, followed by vigorous cycling, often restores silky-smooth operation.
Step 3: Electrical Resurrection
This is where science meets art:
Step 4: Cosmetic Glory
Refinishing the walnut cabinet can transform a unit. We do use real wood oil or Danish oil, not polyurethane. We clean the glass dial carefully; those silkscreened letters are fragile.
Knobs? We polish with metal cleaner, but never use abrasives on anodized aluminum.
Faceplate lettering? We avoid harsh chemicals—just mild soap and a microfiber cloth.
Step 5: Calibration & Sonic Check
After the repair and cleaning, it’s time to dial in the performance:
When done right, the result is astonishing: a sound that breathes—liquid mids, velvet highs, and bass with a tactile presence that modern gear rarely matches.
Our promise for Audiophile-Level Results
Why It’s Worth It
The payoff isn’t just sonic—it’s emotional. Restoring a 1970s Marantz or Sansui is like bringing a classic car back to life. Every glowing dial lamp, every smooth rotation of a volume knob, connects you to an era when music mattered enough to build machines like this.
And when you drop the needle on your favorite record and hear that warm, enveloping sound, you’ll know: this wasn’t just a repair. It was a resurrection.
We have a 14-day return policy, which means you have 14 days after receiving your item to request a return.
To be eligible for a return, your item must be in the same condition that you received it, unworn or unused, with tags, and in its original packaging. You’ll also need the receipt or proof of purchase.
To start a return, you can contact us at theturntablestore@gmail.com. Please note that returns will need to be sent to the following address:
The Turntable Store
45 Market Square
Manheim PA 17545
If your return is accepted, we’ll send you a return shipping label, as well as instructions on how and where to send your package. Items sent back to us without first requesting a return will not be accepted.
You can always contact us for any return question at theturntablestore@gmail.com.
Damages and issues
Please inspect your order upon reception and contact us immediately if the item is defective, damaged or if you receive the wrong item, so that we can evaluate the issue and make it right.
Exceptions / non-returnable items
Certain types of items cannot be returned, like turntable needles and custom products (such as special orders or personalized items). We also do not accept returns for hazardous materials, flammable liquids, or gases. Please get in touch if you have questions or concerns about your specific item.
Unfortunately, we cannot accept returns on sale items or gift cards.
Exchanges
The fastest way to ensure you get what you want is to return the item you have, and once the return is accepted, make a separate purchase for the new item.
European Union 14 day cooling off period
Notwithstanding the above, if the merchandise is being shipped into the European Union, you have the right to cancel or return your order within 14 days, for any reason and without a justification. As above, your item must be in the same condition that you received it, unworn or unused, with tags, and in its original packaging. You’ll also need the receipt or proof of purchase.
Refunds
We will notify you once we’ve received and inspected your return, and let you know if the refund was approved or not. If approved, you’ll be automatically refunded on your original payment method within 10 business days. Please remember it can take some time for your bank or credit card company to process and post the refund too.
If more than 15 business days have passed since we’ve approved your return, please contact us at theturntablestore@gmail.com.
We ensure our customers have the best shopping experience
All items are meticulously serviced and restored to meet factory specifications
We pack with precision and ship in brand new, appropriately sized, boxes.
Be in the know with timely notifications on your order, starting from acceptance to tracking numbers, allowing you to stay connected with your purchase